Boat Trailer Bearing / Brake Repairs
It sometimes becomes painfully
evident that you should have inspected your trailer axles bearings & seals
more often. Sure, you checked or
replaced them a year or so ago, or you intended to grease them when you got home, but
to be broke down with a burned up set of bearings & damaged spindle along
the highway and a long way from help can be frustrating and possibly disastrous.
One well known boat/motor dealer tells
of a boater who's trailer bearings were bad and the driver was intent on
"Getting There" & did not noticing anything wrong. He was
towing a large boat down the freeway in the middle of a large city, at legal speed, when the
wheel fell off, it threw the boat off the trailer, totaling out the boat. Also
most likely there was more than a slight traffic jam.
Not Me:
You say it won’t happen to me.
Well, guess again, have you ever stepped on & broken a fishing rod
tip? Have you ever done a dumb thing on
the launching ramp? How about forgetting
your bait box or left your tackle box sitting at home, or worse on the dock? Have you ever
lost a good fish at the net because you got didn't get around to replacing the
net bag? How many of you have lost a fish because you neglected
to replace a leader after landing a previous nice fish? How about getting a downrigger wire around
the prop? Believe me, it can & does
happen if you stay with this fishing/boating game long enough.
Do you want to leave your boat
& trailer at the mercy of anyone who happens along the highway while you go
50 miles or more for repair
parts? Which could take days if the parts need to be ordered.
Do you leave the wife or partner
stranded along the road on a rainy morning or hot afternoon with your boat, not
knowing when you will return? If you have a cell phone, who do
you call that can help you on a Sunday evening, when you are 200 miles from
home? Do you even know what type of
spindle/brake parts that you may need if you find someone who may be willing to
help?
Hopefully this article may help
somewhat, if nothing more than a wake-up call, by trying to cover trailer maintenance, repairs & other useful
information..
Most boat trailer manufacturers do
not make their own spindle/brake parts.
They buy existing units or assemblies from major accessory manufacturers. This may help you in a way, since it expands the
sources that you can get repairs at if you know what you need and some idea of
where to look.
What Do I Have?:
Now comes the fun part. There are MANY makes & models of boat
trailers. If you are at home and have
the old parts, you could even have some trouble when you drag in the old parts to a
store to ordering new replacement
parts. But on the road is something
totally different. Even if you can find a
marine / RV dealer that is open, do you know the make, model & weight
capacity of your trailer? Do they carry the same make trailer as yours
is, if not, will they interchange? What size, as far as poundage is your axle? Does your axle have 4 or 5 lug bolts, or are they studs? Do you have brakes or not? If you do have brakes, are they surge
type? are they disc or drum type? What size drums are they, 10” or
12”? Are they “Standard” or “Free
Backing” type? Do you need RH or LH
wheel cylinders or shoes? Are the
backing plates painted or galvanized?
Most of the above questions need to be
answered before most parts houses can identify your trailer / spindle / axle /
hub / brakes. Otherwise, you look just
like all the other week-end know-it-all boaters that pull stupid stunts.
Some of the dealers/counterpersons can make an educated guess, after some questioning.
But you might get
rather irritated at yourself if YOU guessed & gave them the wrong information and they
then gave you the wrong parts needed for your trailer 50 miles back down the road.
Non Brake Units:
Small and medium size boat trailers
designed for boats up to about 18' and up to 2000# will probably have no
brakes. Hubs & bearings for non brake models
are a lot easier to find. They are
usually identified by the spindle shaft size at the bearing, and depending on
the spindle size, can use the same bearing, both inner and outer.
Drum or Disc Brakes:
The bulk of the trailer brakes out there that have
brakes will be drum
brakes, activated by a surge unit that the trailer hitch is made a part of the
hitch.
The
surge brakes are applied by the forward momentum of the trailer, when you apply
the brakes of the towing vehicle. The trailer "surges"
forward activating the master cylinder in the surge unit. The more
the trailer pushes against the towing vehicle, the more the trailer brakes are
applied.
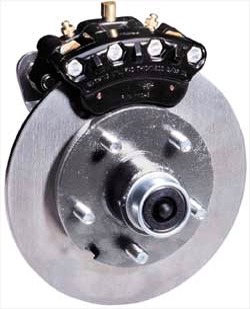
Disc (or caliper) brakes
are starting to show on the
larger type trailers. These can be had with powder coated or stainless steel rotors. The braking methods can be the same as surge drum
brakes (most preferred if near salt water), or a electric unit, activated
automatically when the towing vehicle's brakes are applied. The disc
type surge require a lock-out solenoid which is activated by the towing vehicles
backup lights. This allows you to back the trailer.
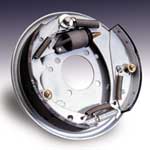
| Drum
Brake backing plate assembly showing RH side |
Drum
Brake hub |
 |
 |
One company that is
offering stainless disc brakes is King Trailers Inc. in Marysville WA,
360-651-7887 www.kingtrailers.com .
They are using torsion springs, replaceable stainless spindles, stainless rotors
& sealed boots over the disc piston (automotive disc unit's boots are merely
a dust cover & do not keep water out).
Inspecting by
Rotating Wheel:
Some say that they simply do a yearly jack the
trailer up, and rotate the wheel to tell if the bearings are good. Yes,
this is a possibility, but how much experience do you have doing this, how
delicate is your feeling and can you hear as well as you once did to be able to
identify a bad bearing?
One thing that has been found, is that
if you CAN hear the bearings, they almost always are BAD.
A suggestion is
to try this method before you remove the wheel and hub. From what you hear
and feel you may be able to come to some educated conclusions of what you find
after you disassemble the hub.
Also if your trailer has brakes, when
rotating the wheel by hand, you may be also hearing the brake shoes dragging on
rust on the inside of the brake drums, that has accumulated during a period of
non use, as when the boat is sitting all winter..
Inspect What You Have, Clean, Replace:
The suggestion is then to do your
homework before all of this potential situation can happen. To take the dust caps or bearing protectors off,
use a mallet and tap on one of the outer edges, rotate slightly and tap
again. Keep this up until the protector has moved out enough for it to be
taken off. Remove the cotter pin and nut from the axle's outer end. Remove
the spindle nut. Keep the greased internal parts clean until you decide
whether they need replaced or not.
Pull your hub off and the outer
bearing will fall out. If the hub does not want to come off, the usual
problem is that the drum has rusted enough on the inside that it is now dragging
on the brake lining. You might have to pry, tap on one side & then the
other slowly moving it outward. Once you get the hub off, the outer bearing
should be able to be taken off easily, you can make a
good judgment call if the bearings are OK or not.
If the grease is light
enough to flow all around the spindle & bearings, when you take the hub off,
if the whole inside is solidly filled with grease & is not a milky
color, You can probably just reinstall the hub. However if is has a
milky/muddy color, this is indicative of water being in there at one time.
Water, especially salt water, is not conducive to good bearing life. If
the grease is a heavy type, there may be water in there but the color has not
changed because the grease is so thick it does not allow the water do anything
other than find holes in the grease.
If you need to get to the inner bearing
and seal, use a hammer handle or large piece of
wood large enough to just go through the outer race or cone as it is officially
known, that is still in the hub. Place this wood inside the hub against the
inner bearing and tap the end to force the inner bearing and seal out. If you use a large steel
punch instead, with all the grease in there, and you can't see, you may just drive the
punch between the bearing and roller cage, possibly ruining it, (I've done
this).
While you have the bearings off,
clean them up with solvent & inspect them for rust or any roughness. If there is any discoloration or roughness in the bearings or
races,
REPLACE THEM. Also, replace the seals
at the same time. A suggestion here is
to write down the bearing numbers for future reference. Start a file of your
trailer specifications & keep this info on your boat or towing vehicle. Make notes as to bearing
& seal numbers. Replace any parts that may
be even the least bit rough or rusty. Buy spare parts and keep them with the
boat.
You should replace both the bearing
& the matching race, never put a new bearing in an old race except in an
emergency situation. The races will have to
be driven out with a long heavy punch and hammer from the opposite side of the
hub. Also it might be wise to shy away from any
"made in China" brand bearings, and stay with a more well known
brand.
Brake Drums:
If yours look like the ones above
with a lots of rust, you will need to clean them up. This could
involve only the use of some corse sandpaper, or a angle head grinder fitted
with a cupped wire wheel. For those of you who may have access to a
larger metal lathe, mounting it in the chuck & running at a slow speed & using a
corse emery cloth does wonders. When you do this, if the bearings
are OK & you do not plan on removing them, you will have to stuff paper towels
inside the spindle/bearing holes to protect them from being contaminated by your
rust removal.
Seals:
You should also NEVER consider reusing a
seal that has been driven out of the hub, except in an emergency, as they almost
all of the time get misshaped on removal. The seals are the most important
item here to keep out the water. Now,
here is one important bit of information. Many
of you will usually buy the bearings at automotive supply stores, probably
because they are closer than the marine store. But they
normally can not cross-reference the numbers for the marine seals. They will have to measure the old seal to
come up with a seal the same approximate size that will fit. However these new automotive seals will only have a single sealing
lip that comes down to the spindle basically straight and
no inner coil tension spring. Most marine seals have a single or double sealing lip with
a circular coil spring inside the lip putting more tension on the seal
surface. The neoprene seal lip will come down to the spindle and then
protrude inward almost 1/2 the width of the metal part. You might get by with a single lip
automotive seal if
the spindle seal surface is totally smooth & with no rust or pit
holes. Is it worth the potential
problems of using an inferior type seal only designed to keep out highway dust,
instead of salt water? The right seals usually sell for from $2.50
to $3.50 each
at marine supply stores. As with the
bearings, write down the numbers off the seal, also measure the spindle dia. of
the seal area, and the dia. of the outside of the seal, plus the total thickness
of the seal body.
It is
also most important to use a strip of emery cloth and "shoeshine" sand the
seal surface of the spindle when you replace the a seal. The reason is
that just possibly the new seal may be a different make, and the new lip is not
bearing exactly on the same spot of the spindle as the previous lip did.
With this in mind, there could possibly be some rust or slight roughness in this
new location. Spindle roughness here can very quickly ruin a new seal,
allowing water in and causing bearing failure.
A
faulty seal will allow salt water to enter the hub and then ruin bearings in
less than 2
weeks time. Believe me as it happened to me.
Brake
Lining:
Inspect
the brake shoe lining while you have it apart. The lining will not be worn
down only by the amount of stopping you do, but if you launch in salt water, the
drum will get rust on the inside of it no matter what you do. This is the
area that the shoes make contact with. The rust is more abrasive and it wears
the lining down way more than just braking will. Even though you flush the
backing plates & brakes out with fresh water after use, the drums will rust.
Take a
look on the inside surface of your tires, if you
are seeing a redish-brown rusty color on the tires and on the frame behind your axle, it more
than likely is rust coming off the brake drum. If you last launched in
salt water, & even flushed the backing plate out, the drum surface will
begin to rust. When you later tow the trailer and apply the brakes, the
brake shoes will scrub some rust off the drum, this is what you are seeing.
It is
my suggestion that if you are a seasonal user that after your last fall trip,
that you take off the drums and wire brush or sand the inside drum down and
lightly oil it with WD40 or a similar product. This may prevent major winter rusting, and extend the life
of your brake lining.
When
you reinstall the drum, you should also check & possibly then readjust the brakes.
Seal Saver System:
There is one thing that is worthwhile to consider installing
also. This is called a Spindle Seal
Service kit, and is made by Bearing Buddy. It is a thin stainless steel hollow cup with
a hole the size of the spindle shaft on one end, & the other is just large
enough to slip over the seal surface of the spindle. There is a small neoprene O Ring that goes between the inner lip and the
saver. The inner bearing puts pressure against the saver and compresses
the O Ring to keep water from coming in under the saver. What this does is give the seal a better surface to seal
against. It being stainless, it will
not rust or get pitted like the regular steel spindle, which can chew a new seal up.
Being thin, it however does increase the shaft dia., requiring
Bearing Buddy's own special seal.
What this was apparently designed for was, if you
had bearing failure & the spindle got chewed up at the seal area, you could save the axle by
simply adding this simple device. However it
this persons opinion that these units should also be installed as a preventative measure
at the same time as new bearings & seals are installed, especially if your
trailer is more than a few years old and you use it in salt water.
One thing about the design and or that
the instructions don't mention is that I have found that the neoprene O Ring
sometimes does not seal out water from coming in behind and under the saver
sleeve. It is my suggestion that at the time you install the sleeve, that
you coat the spindle at the old seal and shoulder area with heavy chassis grease or
a silicone gasket sealer. Then when the spindle nut tightens the bearings against the
shoulder, this grease will act as an added sealant.
Replacement seals for Bearing Buddy can be purchased
direct from Bearing Buddy for $1.75 each, plus shipping They will take orders by e-mail
& credit card.
Bearing Protector System:
The term bearing protectors, refers to
a method of greasing the internal hub and bearings. The most popular is the spring loaded dust cap device with a grease
Zerk fitting in the piston.
The principle these units are
trying to avoid are. -- When backed into the water for launching, boat trailer wheel hubs, heated by
recent travel, are suddenly cooled. Air inside the hubs contracts and a vacuum is created. Water and dirt are sucked into the hubs
between the
seals and the spindle. Corrosion will set in immediately. Bearing failure can be expected within two seasons in fresh water - one season in salt water.
There are a quite few different manufacturers of these units. The most common and original brand, being Bearing
Buddy® at www.bearingbuddy.com ,
Trailer Buddy® Products
www.ufpnet.com/ , Red Eye® Kodiak
Trailer Disc Brakes at www.kodiaktrailer.com/redeye.htm,
Bearing Saver, made by Progress Machine & Tool, Attwood "Hub
Mate" and Fulton
now make a copy of the
Bearing Buddy. These
units are designed with a floating piston backed up and using internal spring pressure to constantly
keep grease pressure on the bearings. The axle hub is filled with grease until the grease forces the
piston outward about 1/8 inch. Because the
outer side of the piston is spring loaded, the piston exerts a slight amount of pressure
(about 3 psi) against the internal grease, which maintains a slight pressure between the inside of the hub and the outside environment.
If the seal surface of the spindle is not damaged in any way, when the hub is submerged, water cannot enter the hub because of this
pressure.
When using this system you need to also use the
lighter weight grease, otherwise the piston can not overcome the higher
viscosity of the grease to force it into the bearings. The instructions of
the Bearing Buddy say to check the lubricant level
prior to launching or when the hubs are warm by pushing in on the edge of the
piston, If the piston moves or rocks, the hub is full of grease. If
the piston does not move, then add grease with a hand grease gun until the piston
starts to move outward. The word here is,
STARTS TO MOVE, do not keep
pumping, as the piston will move all the way out to it's outer stop and you can
them build up enough pressure inside to force grease out the rear seal, or the rear seal either out of the hub, or
the bearing buddy off the outside. Be careful not to overfill. It is better to
drive for a while allowing internal air to dissipate, then stop and refill if
necessary a few times than overdo it initially.
Reliable Sure Lube, and Spindle-Lube®
utilize a different internal pressure system. The
Sure Lube system found on EZ Loader trailers, uses a bleed off hole in the spindle inside the seal that bleeds excess
grease out through a hole in the center of the spindle. The spindle is welded on top of the axle
so there is a escape hole out the rear of the spindle. This hole being plugged with
excess grease, stops the
water from seeping backwards into the spindle/bearing area. This unit can
cause problems unless the hole in the back side of the spindle is cleaned of
hard or caked grease periodically. Otherwise you may overfill the hub cavity, and
force grease past the rear seal which will be un-noticed until later when it
gets spattered all over the brakes, making them in effective & starts dripping
out the backing plate. Grease on your brake
linings will drastically decrease your braking capacity. But by
then water has also leaked inside the hub & into the bearings.
Some of the new hubs have a grease
fitting on the rear side of the hub. The idea here is to force the grease
from the back out thru the bearings to the dust cap. This is supposed to
lube the inner bearing (most important one) better and take some pressure off the seal.
Grease:
Grease is made in two different types. (1) is chassis grease,
identified as LB. (2) The other is wheel bearing grease, identified as GA,
GB, or GC. A multi-use grease will be identified as GC-LB. It is
is advisable to NOT mix one brand of grease with another or unknown brand. It is also advisable to find a good brand that is
readily available from many different sources, so if one store is out, you can
purchase it from the other.
You
will find grease cartridge tubes for the
small 3 oz. grease guns designed to be carried with the boat. Information
on some tubes
may say protection from corrosion of salt-water, others may
say high temperature grease, or a combination of these two. The high temperature
meaning, 550 degrees F. melting point. Be sure that the grease you use is a
Low or Medium Viscosity (high temperature) grease. This low to medium
viscosity (thinner) grease will flow around and through the hub cavity and the bearings, providing more lubricant to the bearings than a high viscosity
grease. High viscosity (thicker) greases will be thrown to the outer hub
cavity wall by centrifugal force of highway driving, where it tends to stick, with only a small amount of grease
left in
the bearing rollers to provide lubrication.
Low viscosity grease will have about
the consistency of room temperature Vaseline. I have found Lubrimatic
grease to be easily available & works quite well.
Carry Spare Parts:
OK, you have decided to replace you trailer
bearings & seals. The bearings can be purchased at an automotive parts
house, but be aware that they usually have about 3 different price levels.
Sure your brother-in-law can get a discount, but many times the marine dealer
can give you a better price because they are buying through the boating industry
& it is suspected that many bearings are sold each year through them. One
customer reported he paid $44 (reg. $63) for a set of bearings at the automotive
supply house, that he could
have gotten from Boaters world for $13.
Now don’t stop at just replacing the
bearings & seals.
Again the freeway or secondary highway is a lonely place for the
broke down fisherman. The suggestion is
to also purchase a new spare hub assembly.
Put it in your towing vehicle or boat in a waterproof bag, & keep it there as an
insurance policy. It might just be that
you won’t need it, since you are now more enlightened as to trailer
maintenance, but what about that other fisherman who has not had the
foresight to do what you just did. Just
maybe your part will fit his trailer, & you now have a new friend for life
that may just share his favorite fishing secrets.
Now remember all those questions
asked before? Here are some things you
will find when you try to find replacement parts.
Replacement hubs for non brake models
are a lot easier to find. Many can be
purchased in the larger marine supply or mail order stores. They are
usually identified by the bolt pattern and shaft size. They usually
sell for about from $30 to $45 each, depending on the size, and this also includes bearings & a seal.
By themselves, most bearing and seal sets sell from $12 to $15 range.
It might be a good idea to also carry
a few spare lug nuts or bolts.
West Marine's catalog lists 3 basic
non brake hub / spindle sizes,
(1) a 4 hole, either stud or hole 4" bolt circle dia.,
with a 1'" spindle dia.
(2) a 5 stud, 4 1/2" bolt circle dia.
with a 1 1/16" spindle dia.
(3) a 5 stud, 4 1/2" bolt circle dia. with
a dual spindle dia. of 1 3/8" & 1 1/16"
Brake type parts are where the fun
really starts. As most of you are aware,
anything associated to “BOAT” means the price is usually doubled. So to save money, and since they are more
readily available, you can try an automotive parts store. They probably will be able to get bearings for you if you have
the old ones, or what is left of them, but they may not have any cross-reference charts to boat trailers. As mentioned before, automotive seals should
only be used as an emergency. The
automotive stores will
not likely be able to find brake shoes for you, as trailer shoes are different than most
cars or light trucks.
You will probably have your best luck
for trailer brake parts at a RV parts store. These boat trailer
brake parts are usually the same as many RV axles use. Now it appears that not all of these stores may
not carry much of this type of parts in inventory, as they can order it and usually have it in a
couple of days. So do not really expect to
walk back out 15 minutes later with what you need. Also,
some parts counterpersons seem to leave the impression that they think that you are “their pigeon”, and
they are not too willing to share any information with you as to what they have
decided you need if they don't have them in stock. It is doubtful that their computer
lists anything more than just a description,
size, part number and price. This makes it hard if you want go elsewhere armed with any knowledge at all, to
try and find what they do not have.
So You Have Driven Too Far & Ruined the Spindle:
If in
this case, you go to a marine trailer dealer, they may want to sell you a new
axle if the trailer is old enough to not have replaceable spindles (which most
fit in this category). They
may tell you that a new spindle can not be fabricated & welded on without
the use of laser guided alignment equipment. My response is BS.
Sure
it needs to be close & even maybe have a little toe in, but many trailers
have been made the old way in the past. Don't cut a farm type mechanic
shop short, as they see this type of stuff all the time.
Most
any competent machine shop can copy the good other side's spindle, turn it on a
lathe & weld it in place. If they tack weld it, then install the
bearings, hub & wheel, then with the tires on a concrete floor, they can
rotate the axle, & watch if the tire wobbles. Pound on the spindle with a
lead hammer in the right spot to align it & rotate again. When it is
the same as the one on the other side, then weld it securely in place.
Sorry, But You Have to Buy an Assembly:
The hub/drum is no problem, as for about $55
to $65 through RV parts stores, you can order a complete painted brake drum assembly with the bearings & seal. This price seems to be a rather good buy for
what you get. However you need to get galvanized & not painted.
If your brake shoes or lining are ruined,
you will find that at most parts houses, you will probably have to buy a whole set of brake shoes
(RH & LH) even though you only need one side. These sell for up to $30 each side, so you have to pay $60 and get
both, the one side you need, and will you ever use the other one? The store may tell you that there are RH
& LH shoes. Yes, they go together on
the trailer axle in that manner, or that is what the computer says, and maybe they are sold that way for liability
reasons. But on most versions, by simply reversing a
bolt and a
stud, you can change the shoe to fit the other side.
The other alternative, they will tell
you is to buy a
complete backing plate assembly, which includes the backing plate of course,
plus a wheel cylinder, brake shoes with new lining, springs clips, etc. for
about $75. These also need to be ordered in either RH or LH
versions. It has been found that these can not be converted to the other
side unless you purchase a new wheel cylinder. All the other backing plate
parts seem to interchange.
What if you only need a shoe return
spring or a wheel cylinder rubber boot?
Sorry, but you have to buy the backing plate unit & get it all.
This "gotta buy what I have to sell
you" may be the new generations thinking. Maybe I am "old
fashioned". Why spend $75 for the whole thing when you only need $25
worth of parts. Maybe in this modern day of computers, & throw
away society, in all probability, very
few counterpersons really know what interchanges, or what fits what, all they
know is just what the computer or micro-flitch number shows. Or
just maybe they feel that since you are in dire need of parts, and they are the
"experts" you will have to
take what is offered. This is not to reflect against the local merchant,
as they are just buying from the distributor. Also in this method, the distributor has less inventory
to stock this way. Do you begin to detect a slight amount of bitterness here?
In my search for parts for my trailer
here are some names of businesses other than your local boat trailer dealer, that I have found that can be helpful.
There may be other good ones out there that equally qualify, but these are the ones I
turned up.
The one company I have found most knowledgeable,
helpful & has individual parts is Rapid Brake Service in
Olympia, WA. They have about all the parts needed in inventory to repair about
any trailer & they will make up the hydraulic hoses as well.
Rapid Brake Service, 3050 Pacific Ave, Olympia, WA 98501 (360) 357-4958
Very knowledgeable owners
& countermen, will supply individual
brake parts, hubs, etc.
can reline shoes if replacements are not available.
South Side Brake & Clutch, 3612 S 54th St. Tacoma, WA 98409 (253) 473-1433
Has good selection of bearings, seals,
backing plate assemblies, hubs, drum assemblies.
Right Way Spring Co., 2545 S Jefferson Ave, Tacoma,
WA 98402 (253) 272-4022
Has limited wheel parts, but is helpful
& does have replacement springs
Listed below is information derived
from the adventure of trailer brake part chasing.
EZ Loader single axle 2000# size
trailer, 12" wheels
Wheel hub assembly including bearings &
seal, (no brakes) 1 1/16" spindle dia. 5 hole @ $35
Spindle bearing diameter are 1 1/16"
Seal spindle dia. 1.250", seal OD 2.200"
Bearing, Outer (L44610, cone –L144649
roller bearing)
Bearing, Inner (L44610, cone –L144649
roller bearing)
Bearing
Buddy - # 1980 @ $18.20 pair,
Bearing
Buddy Bra
# 19B @ $3.35 pair
Spindle
nut threads, .802? OD x 20 tpi. 1 1/8” across hex
Cotter pin 1/8" x 1 1/4"
--------------------------------------------------------------------------------
EZ Loader dual axle 4000# size trailer,
13" or 14" wheels
Wheel drum assembly including bearings & seal, Dexter #8-147,
10”x2.25” brake size 5 hole studs,
@ $57
These are Free backing Brakes. With a Uniservo (1 push rod exiting the wheel cylinder) 1 1/8" wheel cylinder
Backing plate assembly is for a 3500#
axle, Tekonsha #40715, 10”x2.25” Dexter @ $75 (specify RH/LH)
a RH can be disassembled & reversed,
if a LH wheel Cylinder is also used, to convert to a LH backing
plate & or shoes
Front
Lining .200 x 2.250, #908-EE GA3 FA, 8 ¾” OAL
Rear
lining .200 x 2.250, #908-EE GA4 FA, 11 ¼” OAL
Wheel
cylinder bore size, 1.125”dia., wheel
cyl. OD for boot 1.50”
Wheel cylinder kit (complete wheel cylinder) Fulton # 0700R or 0700L
@$23.44 each
If you need hoses, they are $18.95 each
Spindle bearing
diameters are 1 3/8” inner & 1 1/16" outer
Bearing, Inner (Bravo
- set B-A17) (L68111, cone --L168149 roller bearing)
$6.58
Bearing, Outer (Bravo - set
B-A4) (L44610, cone –L144649
roller bearing) $5.82
Seal EZ loader
#C1468 @ $3.50 – (marine - double lip seal)
2.566” OD x
1.800" x .600
National #442251 (automotive - only single lip
seal)
2.566” OD x
1.800" x .410
Bearing Buddy #Buddy #BBI-6002,
@ $2.75 each direct from Bearing Buddy
WHEN USED WITH SEAL SAVER KIT,
2.566” OD x 1.8? x .590
Bearing
Buddy - # 1980 @ $18.20 pair,
Bra
# 19B @ $3.35 pair
Spindle Seal System Kit #2 @ $12.92 pair, (includes seal savers & new seals)
Spindle
nut threads, .802? OD x 20 tpi. 1 1/8” across hex
Cotter pin 1/8" x 1 1/4"
Surge brake unit. Atwood
# 82543, using replacement master cylinder #85841, at $54.95. however you will
have to purchase the front rubber boot & the cap separately for another
$12.00.
Now
For Some How To Do It Information:
Replace
Bearing Races:
To replace the bearing races, use a hammer to start the
race, tap one side, then about 120 degrees, tap it again. Keep moving around tapping & moving
about 1/3rd of the race at a
time. Once it gets deep enough that the
hammer is no longer is useful, then use
the same long punch used to remove the old one and tap it in as before.
When the race is all the way in & seated, the noise of the tapping
will change from a thud, to a ringing type noise, meaning it has bottomed out
against the shoulder of the hub.
Hub Bearing Packing for Non-Bearing Protector units:
When installing bearings in a hub or hub drum for a spindle axle not using
bearing protectors, it is necessary to pre-pack the bearings prior to installing them
in the hub. To pre-pack your bearings, you can buy a bearing packer at your local
auto parts store, or you can pre-grease your bearings using grease in the palm
of your hand and work the grease into the bearing.
The bearing packing tool contains two
convex shaped plates attached to a threaded rod that has a Zerk grease fitting on
the end of this threaded rod. With the bearings in the packing tool, and clamped
down, you
pump grease into the Zerk fitting, forcing grease through the rollers of the
bearing. This bearing is now ready for installation into the hub.
If
you do not have a bearing packing tool, you can achieve the same results
with by forcing the grease into the bearing by hand. Although this is a messy process, it is
equally effective if done properly and carefully. You need to have CLEAN
hands, put grease in the palm of one hand and then with the other hand, roll and rotate the bearing into the grease, carefully forcing
grease through all the rollers. Once you have pre-packed both the inner and outer
bearings, carefully lay them on a clean surface. Dirt in the grease of a
newly packed bearing will act as an abrasive on the bearings and races and can
very quickly shorten your bearing life.
Next lay
the hub or hub drum face down on a flat surface and fill the rear of the inner hub cavity
with liberal amounts of grease, carefully coating the rear race surface. Now
install the inner bearing (the bearing next to the seal) into the rear of the
hub, matching the cone of the bearing to the race. DO NOT INSTALL THE
BEARING IN BACKWARD, THE TAPERED PARTS HAVE TO MATCH!
Now, with the pre-greased inner bearing sitting in the hub drum, add more
grease on top of the rear bearing. There will be a space of about 1/4"
between the inner bearing and the seal. It is essential that this
cavity be
filled with grease.
To install the
double lip seal, the inner lip with the inside coil spring goes toward
the inside the
hub. Set it squarely on top the rear hub bore. Now set a wood block on top of the seal, and tap
the block with a
hammer until the seal is flush with the rear hub bore. Be careful not
to distort the seal by tapping unevenly.
This completes the rear bearing and seal
installation. At this point, turn the hub over on the flat surface, being careful not
to get dirt or filings into the grease at the rear of the hub. Now pack liberal amounts of
grease in the inner hub cavity.
You are now ready to slide the hub or hub drum onto the
spindle. Clean the spindle with a clean rag. (NOTE) The inner surface of the bearing
and the spindle shaft are machined to close tolerances. If the spindle has been
burred, is unclean, or if the rear bearing is not square with the spindle shaft,
the bearings may temporarily hang up as you slide the hub in place. Once the hub
or hub drum is fully in place on the spindle, slide the outer bearing onto the
spindle and into the hub. Match the cone of the bearing to the race. AGAIN,
DO NOT
INSTALL THE BEARINGS IN BACKWARD!
Install the spindle washer and spindle nut onto the
spindle with the hub and bearings in place.
Hub Bearing Packing for Bearing Protector units:
These units will be packed basically the same as the
non-bearing protector units. The exception is that they do require the
lower viscosity grease, and that they do not need to be packed as completely as
the non type since they do have the Zerk fitting for greasing after
installation. Do not rely solely on the Zerk grease fitting on the bearing
protector to up all the grease into the hub, pack as much as you can get in by
hand.
Pre-Load the Bearings:
At
this point you are ready to install the hub and Pre-Load the bearings.
Whenever you install new hubs or replace bearings and races into existing hubs, you should
pre-load the
bearings. Pre-loading the bearings assures that the races in the hub are
100% in place and against their machined stop points. This assures that the hub
is tight and does not loosen up and start wobbling after a few miles.
To
pre-load the bearings. Tighten the spindle nut
Finger Tight, or until it comes up snug, and then with a
crescent wrench or channel-lock pliers, tighten the spindle nut another flat
of the nut.
Now
rotate the hub four or five revolutions in both directions. This should fully seat the races.
Loosen the spindle nut,
then re-snug to finger tight as before, engage the nut retaining device.
Some spindles use a washer that fits a groove or flat on the spindle, and that
has a tab that is bent over one flat of the nut for the retaining device. Others may use a thin sheet
metal cap, with depressions that go over the spindle nut, with the cotter pin going
thru opposing slots and through the spindle. This lock nut has the slots in
slightly different locations so that exact tightness can be accomplished.
Still others may use a "castle nut". This castle nut is a
regular nut that is longer with slots on the outer end for a cotter in to pass
through.
Never run your spindle nut Overly Tight, this
will cause your bearings to over heat. And cause premature bearing failure.
Never run your bearings too loose. A slightly loose spindle nut will run
for many miles, but if it is very loose the
individual rollers may come apart in the bearings, causing lots of
trouble.
Push a proper length cotter pin through from the top, either bend the bottom inner end
inward and the outer half up and over the end of
the spindle, or bend one end forward and the other rearward, to keep it from coming off. Note that the dust cover or
bearing protector has to move freely and not contact the cotter pin.
You are now ready to install your dust cap or bearing protector. A
short piece of 2" I.D. water pipe makes a good tool to install a plain
dust cap. Most of the bearing protectors, are simply hammered
in with a plastic mallet.
On your initial run of highway travel, after
20 to 30 miles pull off in a safe area and check to see if the hub is loose on the
spindle. At this time it is also advisable to put your hand on the
spindle to check it for overheating. It will be warm, but should not be
hot. Check the other spindles also to get a idea as to just how warm they
all are. If one is hotter than the others, investigate the matter. A
spindle can become hot not only because of a overly tight nut, but because the
brake lining is dragging on the drum. A spindle can also become hot if the
bearings have rusted during the winter off season.
At this time if you have a light to medium weight boat, try to pull and push the tire in and out a few times.
If your boat is large, you may have to jack it up to check this. If your hub is loose, you
will need to re-snug the spindle nut and re-engage the nut retaining cotter
pin or tab washer. This tab washer type may be designed to have more than one
tab for subsequent usage. In use, one tab is bent over to lock the nut
flat, once you get the proper nut tightness., It is not advisable to straighten
and reuse the same tab again on the tab washer,
as it may break, allowing the nut to then loosen up by itself while under tow.
Trailers with Brakes:
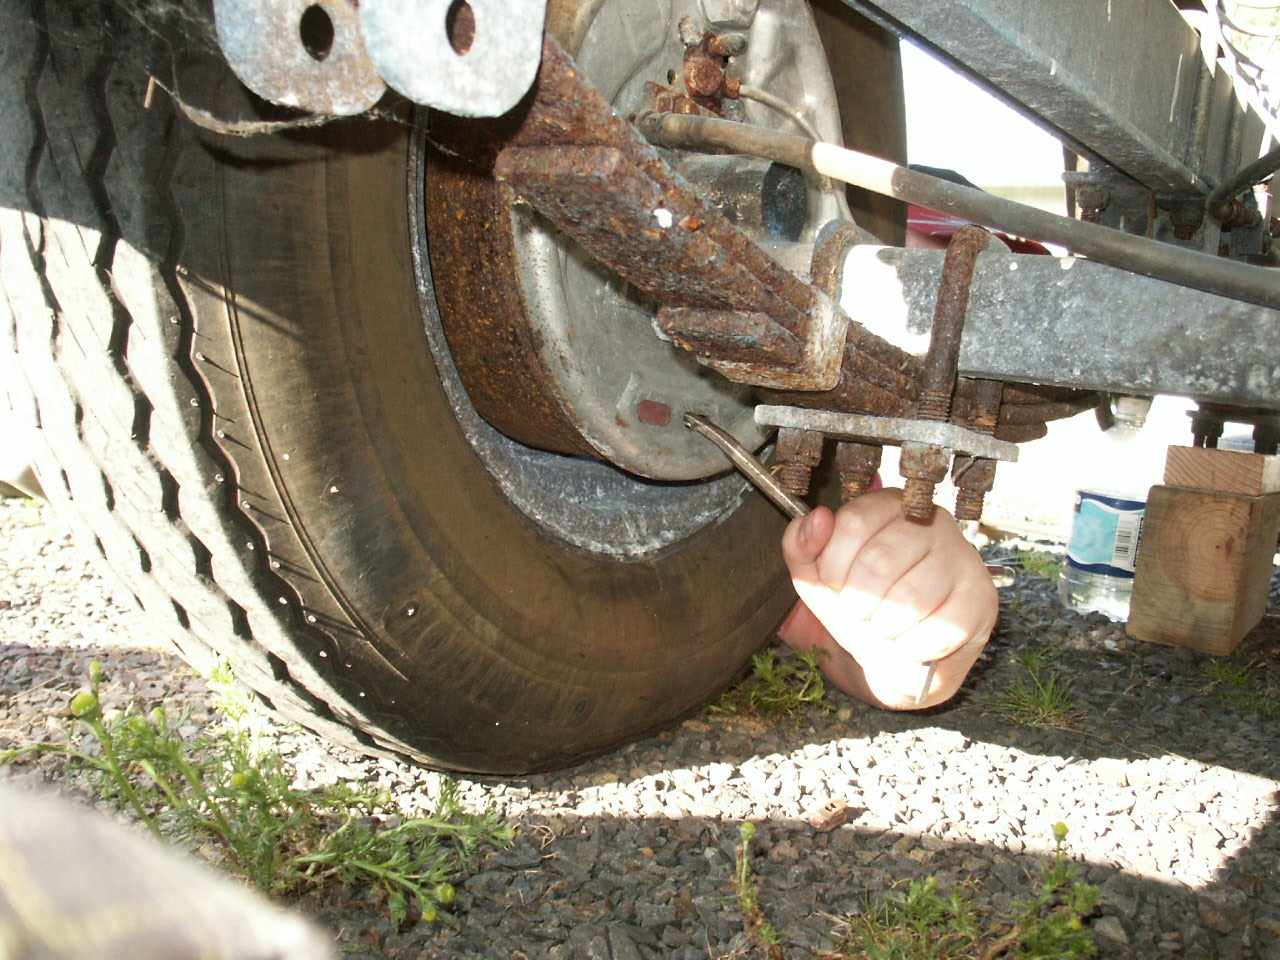
It is advisable after you pull the brake drum off the spindle to take a
digital picture of the locations of all the internal parts so that you have a
better chance of replacing them correctly.
With most of the trailer brakes being drum type, we
will be referring to them unless specified. If possible purchase
replacement parts that are galvanized, not painted. If the hydraulic wheel
cylinder is frozen up & you can not get the piston out because these units only
activate from the front instead of from both sides like a car, you have 2
choices. Replace it, or if you are in a situation where you need it ASAP,
you can press the rusted piston out with hydraulic pressure from a grease gun.
Here you will need to make an adapter using a brake line threaded end & silver
solder a Zerk fitting to it. Sometimes you can not remove the wheel
cylinder without rounding off the corners of the brake line fitting that goes
into the cylinder from the back, & you will have to break the line off.
If this is the case you will need to replace the line, but you have 1/2 of the
makings for this Zerk adapter now.
With the wheel cylinder off the backing plate, the adapter you made & screwed
back into the brake line hole, you can simply attach your grease gun to the Zerk
fitting & pump enough grease into it to force the stuck piston out.
Many times the problem is that there is a slight corrosion between the aluminum
piston & the internal cylinder walls. If this is not bad, you can scrape
it clean & with emery cloth, sand out the buildup, or use an automotive wheel
cylinder hone. If it will not clean up, then replace the wheel cylinder.
When repairing or replacing a wheel cylinder for whatever
reason, there is one variation on reassembly as compared to automotive
installation that is different After you have installed the piston, use
a slight amount of your wheel bearing grease &
smear some of it the inside of the wheel cylinder on the OUTSIDE of the cup,
under the rubber dust boot. You just want to seal water from leaking
between the cylinder walls & the piston, as this is what causes the seizing them
up. Be sure that none of this petroleum
grease gets behind the piston and on the wheel cylinder rubber cup, as it will
deteriorate it causing more problems. Also smear some at the groove where
the boot snaps onto the wheel cylinder & at the piston activator rod to act
as a seal. Remember that these parts, even though they are sold
for boat trailers, are in reality just conventional automotive parts that are
only designed to keep out DUST.
The above paragraph will help keep saltwater from rusting the cylinder bore that is outside
of the contained part that is oiled by the brake fluid. If the outer bore
becomes rusty, you may experience (1) no brakes, if the piston can not move far
enough to activate the brakes. (2) if it does activate, it may not have enough
spring tension to overcome the rust & not allow the brakes to return to
normal. If this happens your brakes will be on all the time until
something wears down, or gets so hot that you then will know you have a problem.
Before you re-assemble these parts you may want to consider sand blasting
all the internal parts, or at least wire wheeling the rust off. Then use a
spray coat of CRC Heavy Duty Rust Inhibitor #06026. This is very
akin to the WWII cosmoline. Off the can it reads "Flexible, amber coating
that protects & preserves metal surfaces, electrical connections, engine
components & fasteners subject to salt spray & high humidity. Also
provides effective protection for steering & throttle linkage.
Will not crack or craze. Resists wash-off & abrasion while providing
long-term protection. Forms a corrosion-proof insulating film."
Coat each part with this inhibitor & let them dry before you assemble them
onto the backing plate.
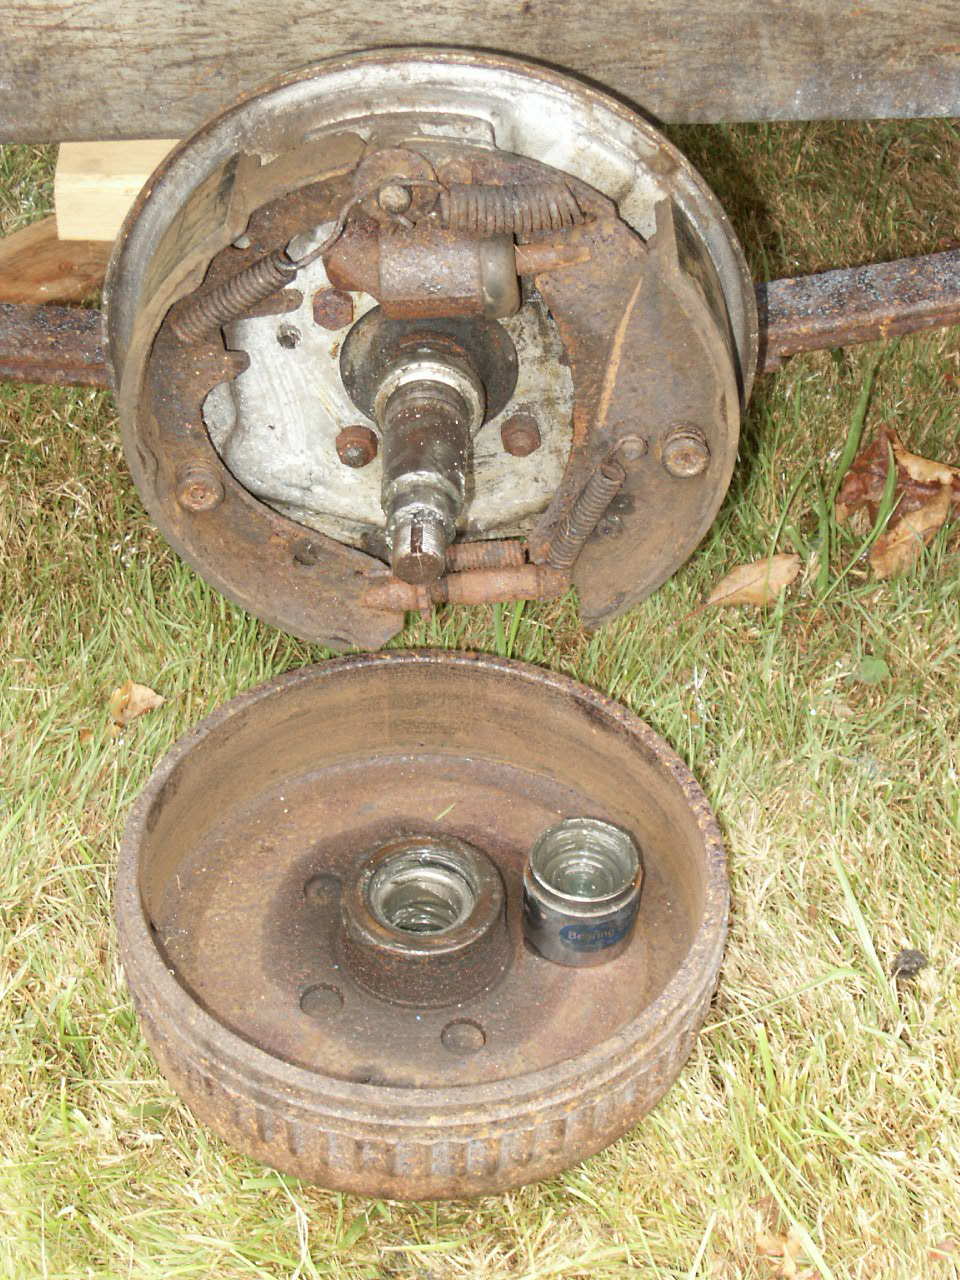
| These
brakes shown were serviced with a new wheel cylinder installed,
& the other internal parts repainted with Rustolium, a year before. The trailer was
used only 4 times in salt water but from launches that did not have wash-down
facilities. |
| This
tandem Right Rear unit has a frozen wheel cylinder that is questionable whether
it can be salvage. This brake unit will need extensive cleaning & a better preservative
on all the parts |
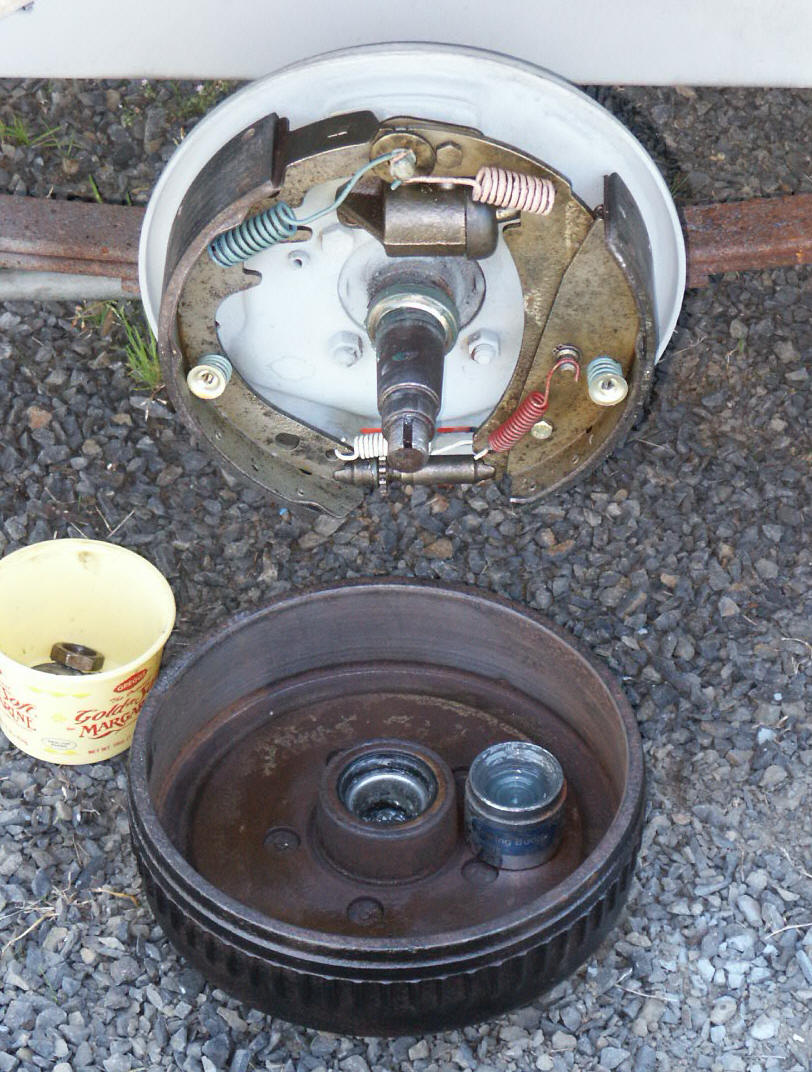
The same unit as on the left after wire brushing, sand blasting, painting
with CRC Corrosion Inhibitor, lathe spinning the hub with corse emery
cloth & new springs installed. Plus cold galvanizing spray paint on
the backing plate & frame |
 |
 |
Another thing to do is to smear some wheel bearing grease on & in the
brake line bleeder valve hole on the wheel cylinder after you have bled the
brakes. Or get one of the rubber caps designed for this. What this does is keeps saltwater from leaking back in thru this
bleed off hole & collecting behind the valve seal, creating a rusted in bleeder
valve next time you try to adjust the brakes or need to make repairs.
If you even use the trailer in salt water occasionally, no matter how much
you flush it, the internal brake parts, (springs, hold downs, adjustment units
etc. ) WILL become RUSTY even to the point that they will become weak or
deteriorate to the point where they are not reusable.
You can usually salvage the rusty shoes & drum, but the parts that over
time seem to need replacing are the springs. If you are not in an area
where you can readily obtain original replacement internal parts for these
brakes, the usual automotive springs can be substituted. They however are
not made of stainless steel like the originals, but may be able to get you by if
you preserve them. I have found that Car Quest brake axle kit #H7068
is a universal kit that you can pick thru & find springs that are close enough
that will function.
If you have to buy a
new backing plate assembly do not even consider a painted one UNLESS you are on
the road & broke down. It will be
cheaper as it is designed for regular automotive type RV trailers, NOT boat trailers.
Adjusting the Brakes:
Re-install your tires and rims on the trailer at this
time and find the brake adjusting slot at the bottom rear of each brake backing
plate There will usually be two slots on the back lower side of the backing plates.
These backing plates are universal and
can be used for either RH or LH units. It might be advisable that while
you are replacing the parts and before you put the hub/drum on the spindle to
locate the adjusting slot for each wheel. It however is usually the rear
slot for the RH side & the front slot for the LH side on boat trailers.
Remove the small oblong rubber plug if applicable, from the brake adjusting slot and insert
a brake adjusting tool or screw driver in the slot and locate the star with the
tool in one of the notches. Rotate the star nut
on the brake adjusting screw inside the brake unit by moving the tool up or down while
the inner end is engaged in the star nut, moving the nut down. Usually the
threads are RH so the tool needs to be inserted with the handle end down & by
raising the tool up, you extend the threaded shaft tightening the brakes. Drop
the tool back and engage it again, and again.
If you go the wrong way it will just bottom out inside the adjuster and you
can not move it any farther. Change your motion direction and rotate the start nut the other way until you can feel and hear the linings start to drag
as you rotate the
drum.
Continue to adjust the star nut with the tool and rotate the wheel
until you cannot turn the tire and rim by hand so you can tell when you are
getting close.
As you turn the wheel now you
should hear a slight dragging of the shoes the drum.
Go farther to where it tightens up & you can not rotate the wheel. This
will align the brake shoes & now you can back it off, otherwise you may have
one wheel set differently than the others. In backing it off, I mean, reverse your tool and back it off about four or five clicks on the star adjusting
nut, or to where it has minimal drag so the brakes do not get hot when you are
towing. This will have your brakes adjusted to their optimum set point.
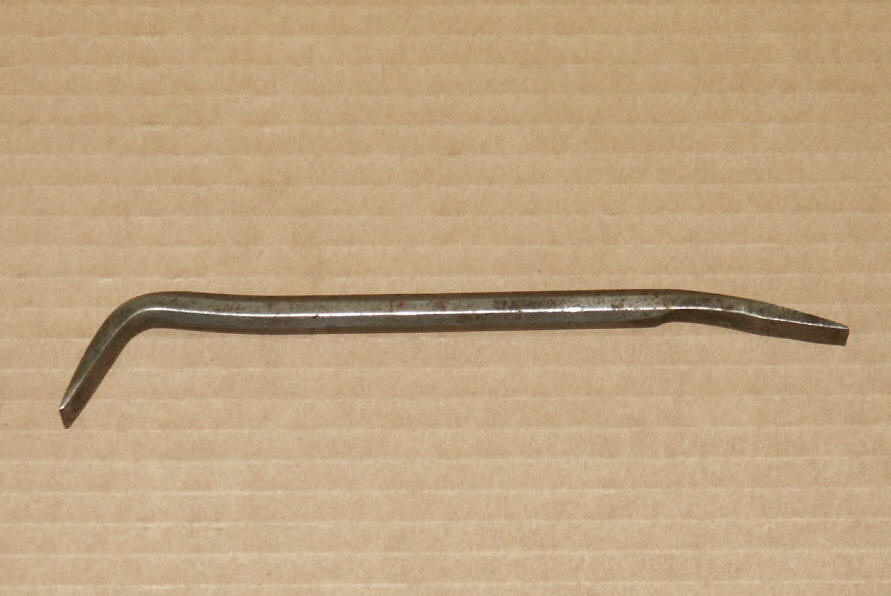
| Brake
adjusting tool |
Adjusting
the brakes |
 |
 |
Bleeding The Brakes:
If you did not remove the wheel cylinder, or allow the piston to come out,
allowing brake fluid to escape, you will probably not need to go through this exercise.
Otherwise, you are now ready to bleed the brakes. With the method described below
one person can do this job.
First
fill the surge brake master cylinder reservoir with automotive DOT type 3 brake fluid.
If you have had more than one wheel apart for repairs,
go to the brake wheel cylinder farthest from the master cylinder in
the brake line tubing sequence first.
Obtain a piece of 1/4" clear plastic hose about two feet long, place a 3/8"
box end wrench on the bleeder fitting & then push the piece of
hose onto the bleed valve barb. Now you will need a clear container (I
like to use a cleaned clear bottled
water bottle so I can see what is happening) to use as your fluid receiving
container. Set the fluid receiving container at some point higher the wheel cylinder.
Now
route the plastic hose from the bleed valve barb to the fluid receiving
container. NOTE: The fluid receiving container must be above the wheel
cylinder so that any bubbles trapped in the bleed hose will flow up away
from the wheel cylinder, not back towards it, which would be the case if the
fluid receiving container were lower than the wheel cylinder. Pour about
1" of brake fluid in the container, enough so that the hose end is
submerged, otherwise in your process, air will be sucked back into the system..
Open the barbed
bleed valve on that wheel cylinder part of a turn, with a 3/8" box end wrench.
Going to the
surge brake master cylinder unit, you may find different methods of manually
activating the master cylinder without actually backing the trailer up.
The simple method is to remove your ball hitch unit from the receiver of
your towing vehicle & latch the ball into the hitch. Now you can use
the extension as a lever to pump the master cylinder. One brand of surge
unit will allow you to insert a large screw driver into the 1/2" dia. hole in the coupler under the
nut on the pushrod which extends out the front of the brake coupler housing.
Be sure that you reposition the backup lock lever down to allow the
master cylinder unit to operate.
Remove
the cap on the master cylinder reservoir and fill it. With your
"LEVER" in place, you can use a slow back and forth
motion to apply levered pressure directly to the master cylinder
pushrod. The shock damper mechanism will still be in use, but it just
takes a little more force to work your "lever".
You are now purging air from the
brake line and wheel cylinder. CAUTION. It is not a good idea to look directly into the reservoir while pumping the push
rod. The brake fluid may squirt up with considerable force during the
first part of each pump stroke. Brake fluid is something you don't want in the eye. You can
set the
filler cap on top to control this squirt.
As you pump brake fluid into the system, you will begin to see it flow up the
clear plastic tube to the fluid receiving container at the wheel. (CAUTION - Never let the
main reservoir
fall below 1/2 full during the bleeding process). If the fluid gets too low
and sucks air down into the piston of the master cylinder, you must start
over and the new air just sucked in and all brake fluid already in the
system will need to be purged out. As you pump fluid thru the system, the
bubbles you have been seeing in the tube or fluid receiving container will cease.
This indicates that you have completely filled the system with brake fluid.
Now,
with the bleeder hose still on the bleed valve barb, and the hose end still
in the fluid, close and tighten
the bleed valve. Remove the hose and repeat this process by going to the next wheel that is next, in being the
farthest from the master cylinder. There is a small rubber boot that comes
with the new wheel cylinders that covers these exposed bleeder valve
barbs. Be sure to place them back on the barb when finished to help keep
water out of the barb.
Before moving to the next wheel, check and refill the master cylinder in the
surge brake unit.
Next,
apply pressure to the push rod and hold hard pressure on the
"lever" for five or ten seconds. This will develop maximum hydraulic pressure on
the system, and make it easy for you to see fluid if you have any leaks.
After totally checking the system for leaks, you are now ready to adjust the
brakes.
After completion of the bleeding
process, refill the master cylinder reservoir and reinstall the reservoir
fill cap and tighten.
Testing
the Brakes:
Now have a helper activate the surge brake master cylinder with the large screw driver, as you did when you were bleeding
the brakes. Vigorously spin the tire and wheel and then have him apply the screw
driver pressure to the master cylinder push rod. The wheel should come to an
abrupt stop. After the pressure on the master cylinder is released, the tire should
rotate freely with only the slight drag of the shoe and drum noted. Check both sides to confirm
that they are operating equally, otherwise when you apply the brake pedal while
in motion on the highway, the trailer could pull to one side.
Road Test:
You
have now completed the installation and are ready to road
test your workmanship. NOTE: There is a mechanical time delay built
into the surge system through a small shock absorber internally in the unit. Your trailer brakes will be felt to engage about 1/2 second
after you have applied brakes in the tow vehicle. Depending on your
trailer & the weight of the boat, you may not really feel the trailer's
braking system taking a hold until the last 30' or so from a complete stop.
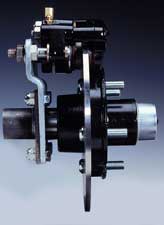
Converting
Drum to Disc Type Brakes:
For those of you who frequent salt water, & get tired
of replacing your brakes every couple of years, there is an answer.
Convert to Disc type. These units are available from of marine dealers as
replacement but are listed for each wheel, NOT per axle. This means
that if you have a tandem axle you will need to purchase 4 units at
approximately $150 each. Plus you MAY have to also purchase a new
master cylinder / hitch / activator unit for another $160, or purchase a
electrical backup
lockout switch that locks the trailer brakes out so you can back your boat
trailer. This seems expensive, & for those of you who are not
concerned about your equipment, you will not be reading this anyway. For
you others, replacing individual parts frequently gets expensive & also cuts
into our fishing time.
Most of these disc units use caliper type brakes & rotor so common on automobiles
now, but with a
stainless rotor. For a link to Tie Down Engineering Inc. , go
to www.tiedown.com
| Tie
Down brand Disc Brakes |
Front
View |
 |
 |
Tires:
It should go without saying, don't leave home without a spare
tire. For trailer application, it is essential that you
select the correct tires to match your application and capacity
requirements. (ST) Special Trailer tires are normally more expensive than
(P) Passenger car or (LT) Light Truck tires, because they are built tougher
with more material and are more bruise resistant. This is necessary
because most trailer suspension systems are stiffer and less sophisticated
than automotive suspension systems. Consequently the trailer tires must be capable
of withstanding more abuse.
Tire inflation pressure is one of the most important factors in tire life. Tires should be inflated to the pressure recommended by the manufacturer for the load. Pressure should always be checked cold before operation. Pressure will increase as the tire gets warm from the trailer being towed any
distance. Check inflation pressure weekly during use to insure maximum tire life and monitor
your tread wear.
The last letter of the tire designates its load range and
equates to the amount of air pressure required. Tires with Load
Range "B" usually max out at 35 PSI; Load Range "C" can go to 50 PSI.
Inflating the tires to about 90% of maximum pressure is suggested.
The following Tire Pressure Chart lists the standard recommended pressure for most common trailer tires.
|
Tire Size |
Pressure |
Tire Size |
Pressure |
Tire Size |
Pressure |
|
4:80 x 12 B |
35 |
ST 185/80D13C |
50 |
8.75 x 16.5E |
75 |
|
5:30 x 12 C |
50 |
ST 205/75R 14C |
50 |
18.5 x 8.5 x 8C |
50 |
|
9.5 x 16.5 E |
75 |
ST 215/75D 14C |
50 |
20.5 x 8.0 x 10D |
70 |
|
ST 155/80D 13C |
50 |
ST 215/75R 14C |
50 |
20.5 x 8.0 x 10E |
90 |
|
ST 175/80D 13C |
50 |
ST 225/75D 15D |
65 |
|
|
From the above chart it can become obvious that regular
automotive tires with an inflation of from 27# to 32# will not handle the
load that most boat trailers require.
One recommendation is, with a felt marker pencil is to mark
on the fenders near the tires, the pressure that you try to maintain in those
tires. This helps for those of us who tend to forget.
The one thing that should
be mentioned however, is that if you carry a spare trailer tire and wheel
mounted flat on the tongue of the trailer, be sure that the valve stem is positioned
so it is pointing DOWN. If this is not possible with your mounting
situation, then at least position the wheel so that the stem is behind the winch
handle to
help keep you from stepping on it. If you are like many who walk out on the
tongue during the reload at the launch, you can very easily step on this stem, breaking it
off. Then when you really need a spare, it has been damaged, and possibly
not known. Then when you need the spare, it is
flat.
Trailer Ball Height:
The theory is that the trailer and tongue should be road level when attached to your towing
vehicle. For proper load distribution you want the trailer frame to
be close to level to the road. This is more important with dual axles than
a single axle because the load needs to be distributed evenly on BOTH
axles. If not, you can be exerting way more weight on your rear
tires than they are designed for & can have premature tire failure, like a BLOW
OUT. You may even have the rear tires dragging on the underside of the
fenders.
I have heard that ball height is also more
important when using a trailer the hydraulic surge brake set up. The word is if
the tongue is too low then the trailer will apply pressure to the surge brakes
towing on level ground. Then when you do need your trailer brakes, they would be much less effective
because of all the heat. If the tongue was too high then the brakes would not apply as quick or hard enough as a properly hitched trailer would.
This however slightly controversial & I would like for someone to explain to me in detail.
On many larger tandem and triple axle torsion trailers, the height to the top of the hitch ball should be from 17 inches to 21 inches above the ground when loaded. This
balances the load properly on the trailer. An inch or so either way is OK as the weight of the boat changes with full fuel tanks vs. 1/2 or less
etc.
On most modern towing hitches that use the 2" square receiver frame
mounted, you can buy removable hitch extensions with the correct drop or lift to
accommodate your needs at most automotive / marine stores. If you buy a
different towing vehicle, you may have to change the removable hitch to a
different height because of a new set of circumstances.
Useful Tricks:
Carry a few 2" X 6" boards about 12" long to
be used for blocking under or above a jack if you need to jack up the trailer.
This is a lot easier than trying to find rocks in the ditch large & flat enough
or a rotten fence post.
Occasionally you may have lug nuts seize on the studs and then the studs would turn in the hub when
you try to remove the nut, making it impossible to get the wheel off. You
will have had to remove the entire wheel and hub assembly and drill through the backside of the stud and push it through the hub to remove it.
If this happens on the road, you will not be able to do your own repair on the
spot. You might therefore try using an anti-seize compound on the stud
threads each time you work on a wheel/tire.
One trick when backing a trailer, put your hand on the bottom of the steering wheel and use your mirrors.
Then all you have to do is move your hand in the direction you want the trailer to go.
Practice this in the driveway
or an empty bank parking lot on a Sunday morning a few times and you'll get the hang of it.
It may be hard to see correctly & compensate if you have the newer mirrors that
the RH one says things are closer than they appear. Here you will
see the LH side in proper dimension, but the RH will be out of proportion.
Some boaters will get a standard mirror made & replace this RH lens.
On average boat ramps, a good rule of thumb is to back the trailer into the water until the front of the fender is at water level. On extremely flat ramps you usually need to back in further; but on steeper ramps, not so far.
Keep in mind
also that the type of boat & or trailer could make a big difference here
& you may have to go deeper.
One thing you can do to help if you have a tandem trailer and loose a
bearing or have a flat and need to limp nearby for repairs, is to use an old
travel trailer trick. That is to carry a short 2x4, 4" or so
long with a hole drilled through each end. In use, if say the rear tire went
flat, jack up this axle. The pivoting "walking arm" that is the
anchor for the rear of the front spring and the anchor for the front of the rear
spring is what you need to concentrate on. This arm is normally about level and
equalizes both springs. With the damaged or rear axle jacked up this arm will
tip down in front because you have moved the load. Use the 2x4 block and
wedge it above the front of this arm and under the frame. Run a wire through the
holes to keep it from jiggling out. Now let the jack down and you will have
transferred a majority of the weight to the remaining or front or rear tire. I
would not go far with this system, & check the other tire often, but it may
just get you off a freeway.
Another thing that may save the day is to beforehand,
purchase a couple of Edelmann # 120300 or Weatherhead #131X3 fittings. Or secure
a new flared brake line tubing nuts of the proper size to fit your unit.
Make up a short piece of flared tubing to fit this nut. Install this
tubing on the nut and bend or flatten the outer end. Solder or weld the
outer bent over end so that it will not leak. You have now just made a
brake line plug. The Edelmann is itself a threaded flared plug. If you get in a situation on the road, that you have to
move the trailer, but you find that there is something broken or damaged inside
the drum unit and you are loosing, or will loose brake fluid. Disconnect the brake line
from that particular wheel at the junction block on the axle. Take one of
these plugs and screw it into the junction block where
you just removed the tubing. What this will allow you to do, is move the
trailer and possibly still have trailer brakes on the other wheels.
There is one more thing that may well help extend the life of your
brakes. It is a fresh water wash flush system. This unit has a garden
hose fitting attached to one end of plastic tubing, the other end goes into a
tee and then into the backing plate of each wheel. When you get the boat
out of salt water, you can use fresh water to flush the salt out of inside the wheels.
This needs to be done before you drive away from the prep area & before the salt
has a chance to dry. Many launches do not have a flushing hose. One method if this is the case, is
to carry a 5 gallon plastic bucket full of fresh water & adapt a small bilge
pump to it for this purpose. Power for the pump can come
from your downrigger plug ins, or off the trailer plug in. West Marine & Boater's World list these kits for about $40. Also consider using
the product called "Salt-Away" when you flush. Add this to your
flush. Nothing will totally stop salt rust, but this
stuff does help.
There also are also a few pre-requisites. Always carry a
tool box that is adequately stocked with tools and emergency type accessories.
Have a lug wrench and proper jack. Carry some wooden blocks for blocking
& to act as chocks in front of and behind the opposite tire.
Also one thing to consider is that if you are trailering a
heavier boat & your towing vehicle has an automatic transmission, is
when you are reloading the boat onto the trailer at the launch, upon initially backing down
the ramp, when you stop, place your emergency brake on BEFORE
you put it in PARK. What this does is remove the possibility of damaging the parking
brake dog in the transmission. In reloading the boat, there is a good chance that
the weight of the boat will drag the vehicle back slightly, binding this
parking brake dog. Have you done this & have trouble getting the the shifting lever
out of park, or it makes a loud snapping noise when you do get it out?
The emergency brake is designed to hold 80% of the vehicles weight on a 10% incline. that is why the owners manual
recommends that you apply the emergency brake anytime you park on an incline.
It keeps the stresses to the transmission dog to a minimum.
When retrieving the boat with a manual transmission, set the emergency brake and leave it.
Get the boat all loaded on the trailer and ready to pull out. With the emergency brake still enabled, put it in 1st and S-L-O-W-L-Y start letting out the clutch as you give it gas. When the engine starts to bog down, immediately pop the emergency brake, and you will yank the boat/trailer right up the ramp without even spinning a wheel!
Another safety device is to use chocks. Some will use
one behind each rear tire with a rope attached to each & snap the other end
into a hole in the rear bumper. There are a few boaters that only use one behind the
drivers front tire. They then attach a small rope long enough to bring it
into the drivers door or window. As they drive up the ramp, all they have to do is
pull the chock up & out of the way.
Maintenance:
All
Types
1.
Check your spindle for warmness, & the Bearing Buddies for proper
grease content each time
you start from home, or the launch, and have driven a few miles to allow
the grease to
warm up. They should be slightly warm to the touch.
2.
Check the bearings and repack hubs annually if necessary before each seasons use
3. If
need be, replace the seals annually
4.
Check your lug nuts or bolts for tightness.
5.
Check your tire air pressure every few months, be sure to also check the
air in the spare
6.
Every few years remove the leaf springs, sandblast and repaint them with Rustolium paint
7.
Carry a spare hub assembly, or at least a new set of bearings & seal.
Maintenance:
Brake Type
8.
Check the shoes for wear and adjust the brakes annually or every 2000
miles. Check for
grease leaking on brake shoes. Wash brake pads with brake cleaner
if necessary.
10 Check fluid level
of the master cylinder before every use. If
fluid level gets low, check for
leaks at tubing connections and wheel or master cylinders.
11 Lubricate moving
parts of surge brake unit annually.
12 Flush the internal
brake unit / backing plate out with Salt-Away to help remove rust on
drums (salt rust will cause drum & brake lining wear prematurely).
13 Carry
spare brake fluid with you.
Maintenance:
Disc Type
14 Not a lot to look for here other than check the bearing grease.
Copyright © 2001-2006 LeeRoy Wisner All Rights Reserved
Originated 5-23-2001, Last Updated 06-24-2006
to
contact the author click here